How To Finish a Loop Yarn Blanket
Feb
Learn how to finish a loop yarn blanket, no knitting needles needed! An easy project for anyone with no flair for knitting that you can complete over the weekend. Have you always admired the knitters and crocheters, admire their ingenuity and talent in knitting different yarns to create colorful blankets?
But sometimes taking the time to take a knitting class that takes too long can’t feel too complicated and never really take the time to learn. But luckily these loop blankets require no special tools or previous crocheting or knitting experience! Even hand-knitted loop blankets are fun to make.
The fibers are so soft, smooth, and brightly colored, which is a more precious gift than any gift to give to your loved ones. For this tutorial, I made one size baby blanket, but you can easily adjust it to make any size blanket you like…with more loops, of course. For this blanket, I experimented with using two colors of loop yarn in alternating rows and I am very pleased with the results!
Best of all, this loop blanket is so easy to make and can be finished in one night. So if you have time and want to knit a loop blanket for your loved ones, don’t forget to refer to the basic quilting steps that I list below!
Contents
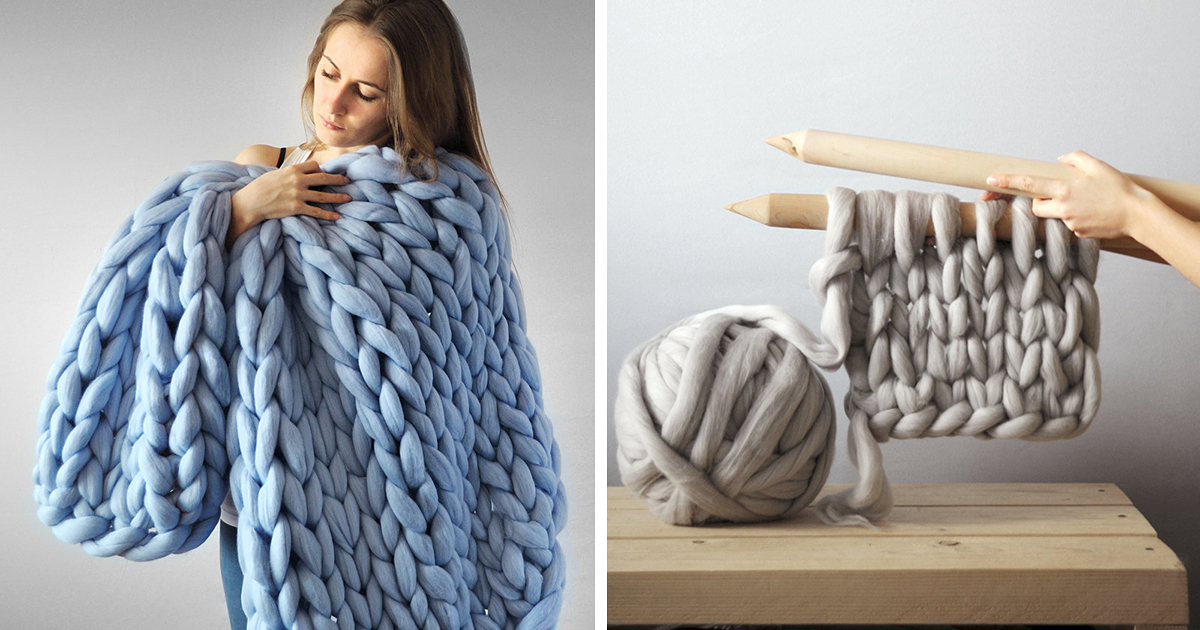
1. Materials You Need To Knit A Loop Blanket
1.1. Loop Yarn
This is the basic and most important material to finish knitting a blanket. Depending on the desired size as well as personal preferences, you can optionally choose different types of thin yarn, suitable colors, and textures. In my opinion, if you use it as a gift, you should choose yarns with bright, eye-catching colors that make the recipient feel warmer in winter.
Quantities include 7 skeins (18 yds each) to make a 50×60 inch throw. (The looped yarn can be quite expensive on the market today, so make sure to buy it when it’s on sale or use a coupon to get the best price.)
1.2. The Scissors
It is an important tool for connecting hooks together. A pair of scissors connects the first and last threads together for a durable, structurally stable blanket that won’t loosen or fall apart during use.
In the making of my blanket, I used 4 rolls of cream and 3 rolls of pink/gray/cream interwoven for this blanket. I use spools of wool that fade from cream to pink and then again from pink to cream. Just like that intertwined to create an extremely attractive and beautiful effect.
I put a border on my quilt by switching between stitches and tinsel. If you’re just starting out and find this confusing, just do the whole thing in one stitch. It’s really easy!
2. Some Notes On Knitting Loop Yarn
For the convenience of tracking the knitting process, I have outlined some notes and conventions to help your knitting go more smoothly:
Usually, we use two main blinds to create a complete blanket, so I convention them respectively: CA = Color A; CB = Color B.
You only need to work with one transparent side of the knit; no need to turn over the back of each row every time a stitch is completed. So the front only needs you to knit meticulously and carefully, and you can ensure a beautiful quilt.
When working with loop yarn, “knitting” stitches are made by pulling the active loops through the stitches from the back to the front, one after the other, and so on. This knitting process will repeat until the end of the quilt so you need to be careful in each stitch because one wrong stitch can affect the final product.
3. How To Make A Loop Yarn Blanket
Initial Setup: Spread the length of each skein of two colors in front of you so that they are parallel to each other with the ends of the yarn to your right; Place CA below, and CB on top, respectively.
Row 1: Work right to left first for CA, count 31 loops, and place a stitch marker on the last loop to mark the end of the row – 31 stitches.
Row 2: Knit from right to left with CB, pull a first loop of CB through the first loop of CA from back to front, continue knitting with CB through each corresponding CA loop to marker, remove marker and place aside – 31 stitches.
Row 3: Work left to right with CA, skipping one CA loop and starting with the next loop knitting through each CB loop. Now leave the skipped loop on the side of the blanket (see the skipped loop below).
Row 4: Working left to right with the CB, as done in the previous row, skipping one CB loop and starting with the next loop knitting through each CA loop. Again, temporarily set aside the skipped loops.
Row 5: Work right to left with the CA, skipping one CA loop and starting with the next loop knitting through each CB loop.
Row 6: Work right to left with the CB, skipping one CB loop and starting with the next loop knitting through each CA loop.
Row 7: Work left to right with CA, skipping one CA loop and starting with the next loop knitting through each CB loop.
Row 8: Work left to right with CB, skipping one CB loop and starting with the next loop knitting through each CA loop.
Rows 9 to 24: Repeat rows 5 to 8 to 24.
Drop the CB and cut the yarn leaving the tail about 4 inches long.
Row 25: Work from right to left with the CA, skipping one CA loop and starting with the next loop knitting through each CB loop.
Tie your loop blanket: Continue with CA and without skipping any loops, knit the first 2 stitches of the row and then pull the second stitch through the first loop (you just finished one loop); knit the next stitch and pull that loop over the previous stitch to tie; Continue knitting each stitch and tying again until all loops are tied.
To fasten, cut the yarn leaving about 4 inches of tail, and cut the remaining loops off the main thread; Drag the tail through the last loop. For CB, again truncate the remaining loops. Weave the ends of both colors through the back of the blanket.
Finally, carefully cut off any leftover loops on the sides of your blanket.
4. Helpful Tips
Based on my actual process of knitting a loop blanket, 9Blanket have learned some experiences that can help you knit blankets easier:
- Keep your active yarn behind your current row of loops. Loops from your working yarn are always pulled over the previous row of loops from back to front.
- Regularly check your blanket while knitting. Every 10 stitches or so you should look back at your stitches to make sure you haven’t missed a loop. Straighten your active yarn and remove the “squiggly” loops to avoid skipping or dropping loops in your row.
- If there’s a rush that has to stop for a while you should cut your next loops together so it’s easier to pick up where you left off.
- Find available coupons from reputable carriers on days with deals. You can apply these coupons to buy online and pick them up at your local store, or download their mobile app to your phone to access their weekly coupons as you shop. . This can save you a decent amount of money to continue working on your next projects.
Most liked posts:
- How To Use A Weighted Blanket
- How To Use Swaddle Blanket
- How To Knit A Blanket With Straight Needles